| Ghost
Photography : How to know the fakes |
You have a photograph that might have captured something
paranormal. Can you spot the fakes and know the logical
explaination of the occurance?
| Long
Exposure. |
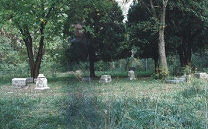
By placing the camera on a tripod with a long
exposure setting. The subject, standing in
front of the camera,moves away while its still
capturing can result in a semi-transparent
image. |
|
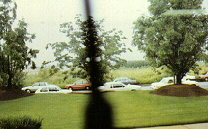
| Reflection
in the Distance |
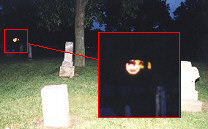
In this case, stop signs are designed to be
highly reflective, and even though it was
in the distance, it reflected enough of the
flash to appear much brighter than its surroundings. |
|
| Dust
on the Negative |
This problem should be very rare, but can
happen. These specs will always appear as
black on the negative and white on the positive
or print. |
|
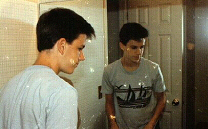
| Flash
Reflections |
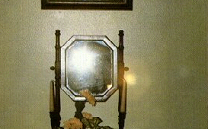
Any shiny surfaces, chrome, glass, polished
wood, etc. can cause a flash reflection. |
|
| Object
Obstructing the Lens |
An object obstructing the lens causes a dark
or black area on the print and always a white
or white area when using a flash indoors or
under low light conditions. This area always
has a fuzzy outline, never sharp. Many simply
caused by lens straps. |
|
| Last
picture in roll |
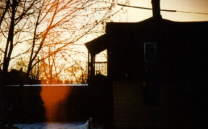
The first and last picture can sometimes have
a strange red, yellow or orange glow on the
fringe. This is caused by faulty handling
and loading the film in more direct sunlight.
Always load your film in subdued lighting
conditions.. |
|
| Orbs |
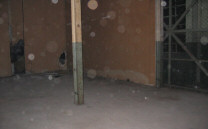
Most orb photographs are taken with digital
cameras under extremely low-light conditions
and are nothing more than digital flaws caused
by lack of pixelation or filling of the proper
colors due to a digital defect. Others might
just be dust particles illuminated in the
flash. |
|
| Bugs |
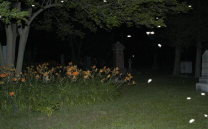
With a powerful flash unit only a few feet
away, insects can brilliantly illuminate and
appear much larger than they actually are. |
|
These
are not the only reason apparation seem to mysteriously
appear in our photos, but there are cases where
the phenomenon seems bizarrely unexplainable that
we have no answers to but to concur and admit -
ghosts have been captured on film.
So for those who are keen on venturing into this
relm, take note and always remember. Respect. ..and
who knows, they might just return your kindness....
To all you ghost hunters - Good luck~ |
Info
and pictures in this article are referenced from "Supernatural
World" By Edgard Thorne, Shadowseekers.org, Ghoststudy.com,
Videoproductionuniversity.com and Personal encounters/investigations.
|
| Tips
on ghost photography |
•
Don't snap pictures facing the sun, or even at a right
angle to the sun. Even bright full moon can cause flares.
The light can flare off the lens and create a false apparation.
• Avoid taking pictures where things may be mistaken
for apparations, including city lights, headlights, streetlights,
reflecting street signs, joggers, dust, rain, mist, insects
, and so on. You may remember what they were when you
first see your photos, but when you are look through your
pics three years from now, you may forget and say, "Cool!
Why didn't I notice that before?"
• Be very careful when shooting indoors, as there
are many things that can reflect your flash: windows,
television sets, metal items, glass, polished furniture,
even polished floors.
• Keep your camera strap, fingers, and rings away
from the lens. If you have a camera strap, either remove
it or place it around your neck (or your wrist, if it's
a short loop). If you have a Polaroid camera, or a digital
with a preview screen, check to see if you're getting
reflections with sample photos, before taking lots of
pictures.
• Don't expect lots of occurance, even the best
suggest that one or two anomalies per one hundred photos
is very good. (Digital cameras record far more anomalies,
but some question their reliabilitybacause of its ability
to self adjust invisible light source.) However, if you're
getting far more than, say, five anomalies per hundred
photos, either you're in a profoundly haunted location
or you're picking up reflections from natural sources.
Rule out the logical explanations before deciding that
you've got ghosts.
• Wait 20-30 minutes before taking photos when you
arrive at a site, for best results. Some profoundly haunted
cemeteries produce anomalies on film from the start. However,
most haunted settings should be very quietly assessed
for about half an hour before attempting to capture hard
evidence of ghosts: photos, EVP recordings, and so on.
• More sensitive film picks up clearer anomalies,
so choose 400 or 800 ASA films for dusk and night photography.
Some people advise using 1000 ASA at the very least, while
others complain that the results are too grainy-looking.
Experiment, and see what you prefer.
• Use more than one camera for each shoot, if you
can. Or take along a friend with a camera. Similar apparations
on different rolls of film help confirm what was there
and establish credibility.
• However, time your flashes, so overlapping flashes
won't create a false alarm. Agree ahead of time how you're
going to alert each other that you're about to snap a
photo.
• Take at least two photos each time, without moving,
as soon as your flash is ready again. Some anomalies do
a "now you see it, now you don't" routine. If
at least one photo taken at the time shows no apparations,
this helps prove that it wasn't a reflection. Apparations
move, shift, and otherwise change. Tin cans in the grass
don't. Shiny spots on headstones don't.
• If you see a "dazzle" or sparkling effect
when you're taking photos, quickly take several more.
Often, the "dazzle" indicates you may be capturing
an apparation, perhaps even a portal manifestation.
• Go with your "gut feeling," and start
snapping photos when the hair on the back of your neck
starts to rise.
• Even better, use EMF meters or temperature gauges
to identify the best areas to capture apparations. In
some settings, even a regular compass can provide hints
about "hot" areas.
• Save all of your photos, at least until you've
taken about 1,000 pictures, or you've seen at least 15
- 20 apparations in your photos. Until you're used to
spotting faint orbs and traces of ectoplasm, it's easy
to dismiss a photo as "nothing." Wait until
you really know what you're looking for, before throwing
out photos.
Many times, apparations are so faint, finding them is
like a "Where's Waldo?" search. Look very, very
carefully.
• Keep a disposable camera in your glove compartment,
unless you always carry a camera with you. You never know
when you'll be running an evening errand and the perfect
"haunted" site will be nearby.
WARNING!
Although the advice above are guidelines to have
a better chance of success in apparation photography,
we are not responsible for any side occurance that
might befall upon those who venture into the paranormal.
Heed with caution and respect. |
|